Hello, there! Where do you keep your contact information? Do you keep it on your cellphone? Most people do these days. I keep some numbers in my cell phone, but I keep most of my information in an address book.

The photo above is of my new address book. I love it! It's a small Filofax planner (personal size). I wasn't using it much prior to converting it into an address book. However, I always loved the bright, red color! As my address book from the year 2000 (!) was getting torn up & ugly, I knew I had to replace it. I just couldn't find anything I liked...

Finally it dawned on me to use my Filofax, instead of searching for something else. I removed all the planner pages, then inserted alphabetical dividers & address pages from Day Runner. I also cut some Pink Paislee scrapbook paper down to size, and glued the "hello" journal card on top of it. It was so simple to set up. I'm really happy with how it turned out!

Thanks for stopping by.
God Bless!
Love,
Tiffany

P.S.
Shown in photo: 
-Saffiano Filofax, Poppy (color), personal size
-Front page scrapbook paper & journal card by Pink Paislee 
-Alphabetical dividers, "A-Z Tab Directory" by Day Runner
-"Seen and Heard" card by Dear Lizzy/ Project Life "Fine & Dandy" (130 piece kit)
-Doily/Michaels Recollections
-Pen by The Day Designer for Blue Sky


Let me introduce you to my new, "Market Floral", Happy Planner! Isn't she pretty? I was out of town minding my own business when I drove by Michaels craft store. I decided to pop in and take a look around. I didn't pack a planner with me on my trip, so I went to peek at the planner aisle. Well, I walked by "Market Floral" and she jumped into my arms and gave me a kiss. LOL.

I decided to pick up a black and white striped cover to make sure "Market Floral" was always protected. A lady needs a jacket to make sure she stays warm, right? He, he, he! This is the first time the company,"Me and My Big Ideas", has offered a deluxe, striped, planner cover, so I snapped it up! Plus, black and white is one of my favorite color combinations.

The planner runs from July 2017 through December 2018. Here's a look at the July starter pages:


(click photos for closeups)

 I promise to share more of the inside in later blog posts. I love flower theme throughout the planner and the gold-foiled lettering.
"Market Floral" is my new best friend!

Thanks so much for stopping by.
God Bless!
Tiffany 

P.S.
-Floral Happy Planner & Deluxe Cover by Me and My Big Ideas
-Pen made by The Day Designer for Blue Sky Planners
-Gold Heart, striped, journal card is by Dear Lizzy/Project Life, "Fine and Dandy" (130 piece kit)


I've been having so much fun with my Traveler's Notebooks! This is my first year using them. I'm so glad I decided to jump in and try them. They're fun to decorate and journal in. Shown clockwise in the photo above are my Prima Planner Traveler's Jounal ("Jet Setter"), Midori Traveler's Notebook, The Reset Girl Doc-It Journal (by Simple Stories), and my Prima Planner Traveler's  Journal ("Jet Setter") again.

I first learned about Traveler's Notebooks when I saw pictures of them on Instagram. If you search Instagram using the hashtag #travelersnotebook, you will discover many artists. Here are links to a few people who inspire me on the site:

  1. phiespoetry 
  2. karentrembart 
  3. thepapervoyager 
  4. darkmetropol 
  5. sumsemarie 
  6. mydocumentedlife 

Clarification: many artists inspire me! Ha, ha, ha! I am only sharing a few links above. I hope you enjoy their photos, too! Do you have any artists to recommend? Please let me know in the "comments" section.

Thanks so much for stopping by.
God Bless!
Love,
Tiffany


Happy Wednesday! I meant to share this with you earlier. This is my "Doc-It Journal" by Simple Stories. It's part of their Reset Girl collection. I think they call it "Doc-It" because it fits in back of the Simple Stories Carpe Diem Planners. Basically, you can doc-it in the back of the planner until you need it. It's perfect for journaling, random notes, or whatever you can think of...

You know what? I just thought of another reason it's probably called "Doc-It"! You can use it to doc-ument your daily life. You can see the edges of my speckled, "Doc-It Journal" cover in the back of my Carpe Diem planner here:


You may read the post I wrote about this planner by clicking right here: *Carpe Diem Planner post.* 

How do you document your life? Do you scrapbook? Journal? Do you create pocket pages with journal cards? I do all 3 depending upon my mood. I plan to share more of my work with you this year. If you have a blog, Flickr, or Instagram account and are doing the same thing, - - - please let me know where to find you in the comments section. I would love to visit you!

Thank you for stopping by!

God Bless!
Love,
Tiffany

P.S.
Products, Photo 1: The Reset Girl Doc-It Journal / Simple Stories, Washi tape / Hobby Lobby, Rollerstamp / Carpe Diem / Simple Stories, Stickers & Journal card / The Reset Girl Collection / Simple Stories.


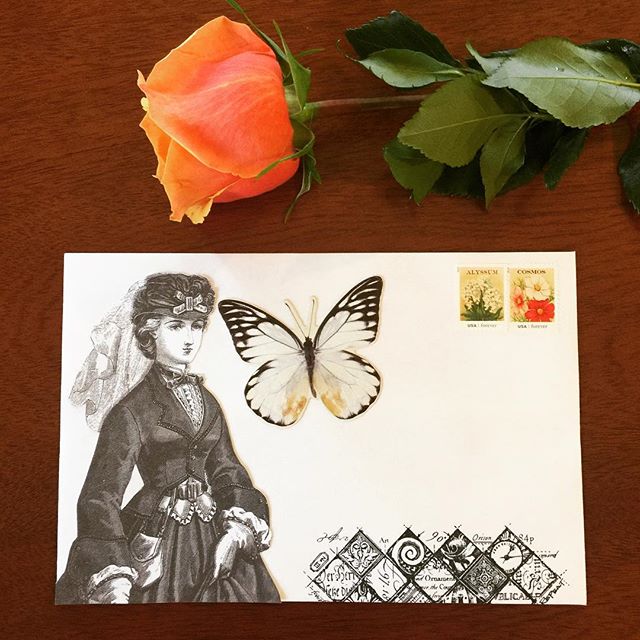
 Greetings! I'm back to share more mail art creations. All of today's envelopes share 5 things in common:

  1. A Stamper's Anonymous Rubber Stamped Image
  2. A vintage illustration of a woman from my personal collection
  3. A chipboard flower or butterfly from Tim Holtz idea-ology "Botanical" layers (a 2017 release)
  4. Postage stamps with "Vintage Seed Packet" illustrations from 1910-1920. (These stamps were first issued by the U.S. Post Office in 2013.)
  5. All envelopes are 6" x 9"

 I was inspired to make these envelopes because I saw Tim Holtz idea-ology chipboard pieces at either Michaels or Hobby Lobby craft store. The "Botanical" Layers pack I bought has an assortment of birds, butterflies and flowers. They come in color and in black & white. There are 83 pieces in the pack.

I thought it would be nice to pair the chipboard pieces with rubberstamps and vintage illustrations. Please take a look below. I hope you like them!


Now, I'm off to finish the letters that will go in these envelopes.

Thank you for stopping by.
God Bless!
Love,
Tiffany


P.S.

Products/Photo 1: Rubberstamp - Stampers Anonymous / Classics #3, Ink - StazOn, Chipboard Embellishment - Tim Holtz / idea-ology / Botanical Layers, Vintage Woman Illustration - my personal collection, Postage - Vintage Seed Packets (2013/USPS)

Products/Photo 2: Rubberstamp - Stampers Anonymous / Tim Holtz / Typography, Ink - StazOn, Chipboard Embellishment - Tim Holtz / idea-ology / Botanical Layers, Vintage Woman Illustration - my personal collection, Postage - Vintage Seed Packets (2013/USPS)
 
Products/Photo 3: Rubberstamp - Stampers Anonymous / Tim Holtz / Typography, Ink - StazOn, Chipboard Embellishment - Tim Holtz / idea-ology / Botanical Layers, Vintage Woman Illustration - my personal collection, Postage - Vintage Seed Packets (2013/USPS)

Products/Photo 4: Rubberstamp - Stampers Anonymous / Tim Holtz / Typography, Ink - StazOn, Chipboard Embellishment - Tim Holtz / idea-ology / Botanical Layers, Vintage Woman Illustration - my personal collection, Postage - Vintage Seed Packets (2013/USPS)


I heard somewhere that to get a letter, you have to send a letter. That's so true! I've been decorating envelopes to get warmed up for some serious letter writing sessions. Do you write letters?

I started writing letters in elementary school to a friend that I made in summer camp. We are still friends to this day! When I was in junior high school, we moved overseas. Letter writing was the perfect way to keep up with all my friends. It was fun! Social media didn't exist way-back-when, ha ha ha! And international phone calls were way too expensive.


Today, I have 15+ pen pals. Honestly, I struggle to keep up. I used to create my own stationery & envelopes - - - one-at-a-time. I would make stationery for 1 person, then write their letter. However, this time I made ALL the stationery FIRST. It really saved time! I only had to take out my craft supplies once, and clean everything up once. And believe me, I make a mess!


The envelopes above are easy to make. Each message on the envelope is actually a Project Life 3" x 4" card that I cut up. Here are the basic steps I took to make all 3 envelopes:
  1. Tape doily onto 6" x 9" envelope
  2. Take Project Life journal card, cut out message & tape on top of doily
  3. Rubberstamp image onto envelope
  4. Add postage in right corner  
  5. Add other decorative elements such as washi tape if desired (as in photo 2)

You can do it, too! What takes time is taping down each decorative element, so that it doesn't get damaged/ripped in transit. I used a combination of tape and a glue stick (that dries clear). A post man explained to me that each letter gets handled multiple times before it reaches its destination. So it's important to glue everything down!

When I take these envelopes to the post office, I will request hand-canceling.* When you request hand-cancelling, the mail won't be run through a machine (where embellishments could rip off). It costs extra for this service, but it's not that much. I'm sorry, I can't recall the fee at the moment... 

I'll be back tomorrow to share more mail art! C'mon back!

Thank you for stopping by.
God Bless!
Love,
Tiffany


P.S.
*CANCELING MAIL -vs- HAND-CANCELLING MAIL: stamps are "cancelled" so that postage stamps cannot be re-used. Basically, mail is run through a machine that makes a mark on the stamp(s) indicating that it has been used. When mail is hand-cancelled, the postal worker marks the stamps by hand. Delicate or decorative mail will be protected. It's a great option if you have fancy wedding invitations with wax seals, or other mail that you want to arrive at its destination intact.

Products/Photo 1: Pen - The Day Designer & Blue Sky, Doily - Michaels/Recollections Brand, Project Life Cards (2015/96 pieces), Ink - StazOn / Gothic Purple, Rubberstamp -Stampers Anonymous / Tim Holtz / Papillon, Postage - Vintage Seed Packets (2013/USPS)

Products/Photo 2: Pen - The Day Designer & Blue Sky, Doily - Michaels/Recollections Brand, Washi Tape - Michaels, Project Life Cards (2015/96 pieces), Ink - StazOn / Cactus, Rubberstamp - Hampton Art/ Danelle Johnson / Art Warehouse, Postage - Vintage Seed Packets (2013/USPS)


Products/Photo 3: Pen - The Day Designer & Blue Sky, Doily - Michaels/Recollections Brand, Project Life Cards (2015/96 pieces), Ink - StazOn / Midnight Blue, Rubberstamp - Hampton Art / Danelle Johnson / Art Warehouse, Postage - Love Skywriting (2017/USPS)


"Without leaps of imagination, or dreaming, we lose the excitement of possibilities. Dreaming, after all, is a form of planning." - Gloria Steinem

I love quotes! The one above is particularly inspiring. I wanted to create something with a romantic feel to include with the quote in my traveler's notebook. I recently bought some romantic/vintage looking papers by Prima Marketing, Inc. ("Debutante" & "Romance Novel") and thought they would be perfect! I decided to cut them up and layer them on the pages above.

In the photo below, I used the "Romance Novel" paper collection. I've been getting pretty philosophical as a big birthday approaches for me, so I wrote some of my feelings down. I'm finding the traveler's notebook format convenient for short journal entries. Plus, I can make everything look pretty! 

Paper crafting + Writing in my traveler's notebook = Absolute Happiness!


Thank you for stopping by today!

Love,
Tiffany

P.S.
Products, Photo 1: Notebook-Prima Traveler's Journal/Jet Setter, Papers-Prima Marketing Inc./Romance Novel & Debutante paper collection.

Products, Photo 2: Notebook-Prima Traveler's Journal/Jet Setter, Papers-Prima Marketing Inc./Romance Novel, Washi-Hobby Lobby, Pen-PenGems.


Guess what? I purchased another traveler's notebook! This one (above) is from Prima Marketing, Inc. It has nice, thick, blank pages that are good for rubber stamping! My other notebook, a Midori Traveler's Notebook, has grid-lined pages. I shared some pages from my "Midori" notebook in my previous post. You can read it by clicking: *right here.* I enjoy variety so both notebooks work for me! 

Quotes by famous people have always inspired me. I meant to watch the series about Albert Einstein called, "Genius", on the National Geographic Channel this year, - - - - but I missed it! In the meantime, these quotes will have to do! LOL. I'll see if I can watch the series if it's available "on demand" through my cable provider. 

So, Einstein is the source & inspiration for the pages above. Plus, I already had the man-collage stamp (called "Treasured Memories 3", by Prima Marketing) which seemed perfect to add with the quotes. I stamped the image on beige-colored vellum and glued it to the page. I really like the subtle change in color from the white pages to the beige vellum. I hope you like it, too! 

Which quote above resonates with you? I love them all, but the one on the left seems particularly important. We all have challenges, but the quote reminds me to push through them, and remember whatever lessons that they offer...

By the way, I heard that the "Genius" show will continue on the National Geographic Channel. They will feature a new genius each season. Stay tuned!

Thank you for stopping by!

Love,
Tiffany

P.S.
Products: Notebook - Prima Marketing Inc./Jet Setter, Man rubber stamp, "Treasured Memories 3"/Prima Marketing Inc., Ink/StazOn, Bookplate/Imaginisce, Numbers stamp/Hampton Art, Harlequin stamp/Stampers Anonymous


This year, I decided to try journaling/memory keeping in a Midori Traveler's Notebook. I saw a lot of pictures of  traveler's notebooks on Instagram, so I thought I would buy one. I'm still experimenting to see if it's a format that will work for me. 

The notebook size is 8.3" long x 4.5" wide. I'm used to writing/journaling on pages that are closer to 8.5" x 11", and really packing the page with information. However, as my life has gotten busier, I don't spend as much time journaling. I'm hoping this new format will encourage me to jump in! I can write down the basics without the pressure of filling up a larger page. 

I also plan to decorate (rubber stamps, washi tape, ephemera, etc...) most pages, since crafting is such a big part of my life now. Before, my journals were strictly words, now they will include visual elements.  

I created the entry below after sharing a special moment with my Mom:


True story!

Thanks so much for stopping by.

Love,
Tiffany

P.S.
The clips holding the notebook open in both photos are from Michaels craft store. The clips were originally blank, so I stamped words inside them.

Products, photo 1: notebook/Midori Traveler's Notebook, washi tape, notebook clip & doiles/Michaels, stamp ink/Prima Chalk Edgers, tag and other embellishments/Crate Paper.

Products, photo 2: notebook/Midori Traveler's Notebook, washi tape/Tokyo Antiques, ticket & word stickers/Idea-ology, notebook clip/Michaels,"Remember This" tag/7gypsies


Today, I am sharing a weekly spread in my Carpe Diem Posh Planner. I basically went CRAZY over the "Posh" line (by Simple Stories) and bought EVERYTHING on Amazon.com . He, he, he...

By everything, I mean the journal cards, washi tape, chipboard stickers (hearts & flowers above), etc... I just bought it ALL and settled in to make this spread that documents a week in my life. I write about the little & big things that happen before I forget them. I don't capture every week, but it's my goal to do so.

How do you document your life? What's your favorite way to record it? Do you use a diary, or post photos on Instagram, Facebook or something else? Please share what you do in the comments section.

Thank you for stopping by today!

Love,
Tiffany
P.S.
Products: Carpe Diem Posh Planner / Simple Stories. Journal Cards, Rollerstamp, Washi Tape & Stickers / Carpe Diem Posh / Simple Stories , Doiles / Michaels / Recollections, Pen / PenGems